TIMELINE
This is a quick overview of the building of the Shed of Reality...and the name's a play on words. When I came up with the idea it was because I NEEDED to be shed of reality!

6/5/2010--First, it's important to pick your location, the direction of the view, accessibility both for you and construction materials. Our side yard, bought when the house next door burned, had access to the alley for our builder friend and for the lumberyard, plus a view that made you think you were in the country, right here in town.
(If need be, check with Planning and Zoning to see what restrictions there might be and how far from the property lines you need to build.)
6/8/2010--Mark laid out the sill board where we planned to put the shed...and good thing, because it became apparent that 8' x 10' was pretty darn small. We upped it to 10' x 10', and it works great.
6/10/2010--Treated posts set below the frost line in cement make it firmly secure.
6/10/2010--2 x 6 floor joists are in place, going one direction for the shed and the other for the deck area. Mark's adding the 3/4" plywood for the floor. I'd planned another layer of flooring (Wood? Cork? Linoleum?), but so far...
NOTE: Wouldn't it have been brilliant to do the insulation at this step, before the floor joists and under the flooring? YES it would. Oy. Well over a year later we finally got it re-insulated.
NOTE: Wouldn't it have been brilliant to do the insulation at this step, before the floor joists and under the flooring? YES it would. Oy. Well over a year later we finally got it re-insulated.
6/11/2010--Floor's in, deck is laid with YellaWood, 2' x 4' studs are in place and the first two walls--front and back--are braced against the wind.


6-13-2010--We rescued this nasty old door with cracked safety glass from the former drug house next door. Someone had tried to break in (big shock) but the safety glass held. J. scraped and painted the door and replaced the hardware, but we decided to keep the cool lacy glass!
It feels very sturdy...
6/14/2010--Rafters and the beginnings of doors, windows and walls in place...we used plywood
siding that's rigid and relatively inexpensive.
6/15/2010--J. helps hold the siding in place while Mark nails it...

6/17/2010--The exterior walls are in place, and Mark's begun to enclose the outdoor storage area at left.
6/18/2010--Joseph nails up the rooftree in the ancient builder's ceremony of topping up.
6-18/2010--We had beadboard plywood left over from another project, and since I wanted the rafters left exposed, that went on top for the ceiling.
6/19-2010--We opted for standing seam metal roof since it lasts almost forever--and as someone pointed out, is also recyclable. If we ever want to do that!
6/21-2010--Roof only needs the ridge enclosed and the trim on the sides of the eaves.
 | ||||
6/21/2010--Here's what the roof "sandwich" looked like before the trim went on...the insulation DID make an appreciable difference. |
6/23/2010--Meanwhile, Joseph worked on rehabbing the vintage stained glass window (our biggest expense of that type, at $40) and the door we rescued from a former drug house (free).
This was right about when the stop work order happened...pretty far along for that...
This was right about when the stop work order happened...pretty far along for that...
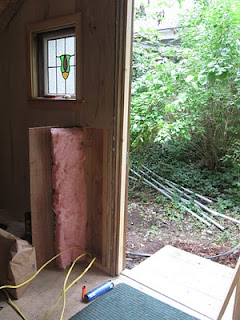
6/25/2010, thereabouts--Insulation and back window ready to be installed...the window is half of a larger double-hung that we put in awning style. Part of the insulation was left over from another job, so no additional expense there...
6/25/2010--Garage sale French doors and red cedar trim are beginning to make it look more finished!
6/25/2010, full speed ahead!--Stained glass window and the old door with the cracked safety glass are in, the back window's hole is cut and the rest of the trim is on...
So far, the insulation under the floor is mostly on the ground...the adhesive didn't. Rather less than pleased...and that, too, makes a difference!
7/14/2010--a bit of a hiatus waiting on various officials, electricians, decisions, etc.--We used thin plywood underlayment instead of drywall, since the shed will have to deal with weather extremes more than a house would...plus we had most of it left from another job! The hole is cut for the electric panel in the second photo.
7-15/2010--Trench dug for the electricity, which has a shut-off at the shed and at the house...it all feeds off our home meter to make things simpler, though it would be nice to know how much it actually costs out there.
You can see it's got its protective wood stain on the photo above...it looked awfully orange to me at first, but I like it now...
You can see it's got its protective wood stain on the photo above...it looked awfully orange to me at first, but I like it now...
7/22/2010--Hooked up, at last!
7/25/2010--Me painting the inside trim...recycled wood, recycled paint...(yeah, if I'd known he was going to shoot a picture I would have combed my hair...)
7/27/2010--Ceiling's all painted, as is the trim...the walls have a layer of recycled paint and then drywall compound for texturing...
7/28/2010--I had FUN (and felt like a kid playing with mud).
7/29/2010--I mixed a little leftover yellow in with our recycled white paint...love the sunny color that resulted.
7/31/2010--J. finishes painting the high spots with a roller...
8/01/2010--We got latex porch and floor enamel to cover the 3/4" plywood, for now. Hopefully it will be warm enough this winter, with rugs, etc. I used spar varnish on the French doors...nice contrast.
So that's pretty much it for construction...now for furnishing and USING it!


