In case you were wondering...

In case you were wondering...

This blog exists to encourage all those who have ever wanted--and needed!--a tiny getaway close to home. A workshop, playhouse, garden shed, sanctuary, mini-greenhouse, studio, home office; whatever it is you need, it IS doable, with some sacrifice, imagination, and compromise.

It helps if you're handy, too.

Showing posts with label insulation. Show all posts

Thursday, October 27, 2011

Serious Progress Preparing for Winter

AT LAST!  All of the rigid foam insulation had let go and fallen to the ground under the shed...as noted before, the adhesive needs to be pressed into place and then the foam pulled free so it will off-gas, then pushed back into place.  Who knew?  So I watched as each piece let go and gave me a refrigerated floor!  I was GOING to get it fixed before another winter, whatever it took.

So hooray, Mark and Zach were free, and arrived yesterday to get us fixed up!

This is the old stuff, all out from under the shed now...you can see the glue spots that let go.  There wasn't a bit of it still on the floor where it belonged.  Somehow it didn't warm the floor much once it was all lying on the ground...

We decided to replace some of it with the 2" stuff, and double up the old...
They didn't have long enough nails with the plastic washers, so here's Mark replacing the nails with screws...Zach couldn't have swung a hammer under there anyway!


Finishing up along the west edge...Zach crawled under for most of it...

You can see some of the little fasteners here--more dependable than the glue, I hope!  And you can tell how little clearance there was...

Mark's squeezing the last bit into place...Zach's underneath guiding it in.


If I had REMEMBERED I'd owned this book since the late 80's, I could have saved us ALL a bit of trouble.  Or a lot.  It's still out there on Amazon, as you can see at the link!

A Place of Your Own Making: How to Build a One-Room Cabin, Studio, Shack, or Shed


Soooo...let this be a lesson to you if you're wanting to build your own place...nails in the floor joists BEFORE you put down the floor, at the depth of the styrofoam, as you may be able to see above. Rest it ON the nails. THEN cover.

Voila', an insulated floor that stays put! (A vapor barrier between the insulation and the sub-floor--or floor, as it turned out to be for us!--is good, too. Duh...)

So looking forward to a warmer winter and a lower electric bill!

Tuesday, February 8, 2011

Guess what?? It's WINTER.


I put up "guess what" photos on my Flickr from time to time--it's become a game with us!  So far no one has actually nailed this one, though they're very, very close.

I've mentioned the problem with the insulation falling off under the floor of the shed...that means there's 3/4" of plywood between my feet and the North Pole!

So what IS this?


It's the paint water in my little enameled tin pot; I left it on the floor overnight.  We keep the heat in the shed at about 48 degrees when we're not there, but it can't overcome that icy floor!


I'm thawing my paintwater in front of the little heater!  Since we have to carry water over from the house, I'm sparing with it.  It'll work just fine once it melts...

And happily, I've since discovered that if I leave the little pot on the wool RUG instead of the floor, it doesn't freeze.  Nether does Pepi's water.  We WILL solve this before next winter!!!

Saturday, December 11, 2010

Chilly Shed Update

So...found a company to do the insulation under the floor, probably next week unless the weather goes completely wonky.  Almost $400, but it will save on electricity (and cranky, frozen Kate) in the long run.  The one that was going to call me on Monday 2 weeks ago never called, even after another contact, so I imagine how dependable they'd be to actually do the work.

(At this point, all but one of the rigid Styrofoam panels have let go and are lying on the ground under the shed.  Grrrr.)

Still planning to put a wool rug in there...this is the one I want, LOVE the Renaissance feel it has and soft sage green, but having trouble finding the owner of the booth to find out the PRICE.  Must be out of town...


Kinda like the goofy rooster, too...J. thinks I'm nuts, and it IS a lot darker than I'd planned to use in there.  I like checkerboard, though...and I KNOW how much this one costs (very affordable.)

I bought a cheap, small throw rug to put under the desk where I work, and the difference it makes is amazing.  Like between comfort and not.


Meanwhile the ground feeders and squirrels are much appreciating our bounty.  It was 45 degrees this morning, below freezing and snowing now...


And fooey, although it seemed as if the waterlogged board had FINALLY dried out and I put spar varnish on it, mentioned in THIS POST, this is now it looks now.

NEVER, NEVER, NEVER USE RECYCLED MATERIALS THAT ARE NOT SOUND.

Wednesday, October 6, 2010

Winterizing progress...inexpensive and easy.


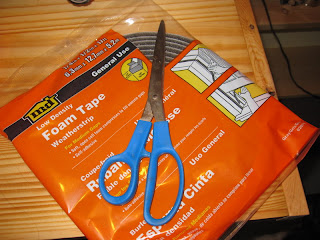
The hardware store offers several types...we figured low-density would compact more readily.

Piece of cake to cut to size...

Done!
Since we used recycled windows and doors, there's not much weatherstripping...both the small door and the French ones have weatherstripping at the bottom, but I could see light around the edges.  Where there's light there's air, and in the winter that means BREEZY.  
Self-stick foam weatherstripping is easy to install and quite inexpensive ($2.99 a roll, might have found it cheaper if we'd shopped around though.)  You need to do it when it's 40 degrees or above to insure a good sticking, so waiting till the day warms up to finish (I quit yesterday when the evening mosquitoes got too interested in the process!)

The French doors are fairly tightly fitted when it comes to closing, but not where air leaks are concerned...I'll just make sure they're shut and locked!  I did the bottom of the window nearest the desk, but we will be doing a removable storm window for that one, too.

Monday, October 4, 2010

Looking toward winter...insulation and other issues

Yep, insulation DOES help, even the relatively thin sheet foam stuff.  Unfortunately, not when it comes off and lands on the ground.  We've lost even more since I posted about it before (you can see more info in my OOOPS-es tab)  We need a skinny handyman!

Definitely something needs to be done before winter.  If I put my hand on the section of floor that still has insulation, it warms to skin temperature in seconds.  On the section where the insulation has fallen off?  Maybe eventually it would warm.  I don't have that much patience!  It stayed chilly.  So did my feet, yesterday, and I was out there for HOURS.

Eventually, I'd like to have something that FILLED the space between the floor joists, but for now just having the insulation we put up in the first place would help...


When we lived on our farm, back in the 70s, we piled bales of straw or hay around our foundation.  Looks weird, but it DOES help.

One layer of plywood between me and the North Pole isn't enough.  The floor's going to be very cold this winter.  (Even here in the house, at the computer, I usually put a heating pad under my feet...just a crawl space here, and this is the NW corner of the house.  Cold...)  So...looking for a good heating pad, or even a heated doggie bed, for under my feet at the desk.

I'll be dragging my antique soapstone footwarmer out there!

And I WILL want the lovely rug that Joseph brought from Virginia in the winter, if we can get rid of the mildew smell...it's thick and padded and should help.  Lysol has some new sprays that aren't as ghastly institutional-smelling for mildew and we plan to try baking soda, too...


I moved my retro thermometer into the shed--this morning it was 40 degrees outside and 40 degrees inside, though it felt colder--buildings seem to hold the night's chill. (Finally let the furnace come on in the house last night!)

This little guy's not going to be up to the task, even though the walls and ceiling are insulated.  It managed to raise the temp 10 degrees in an hour and a half, at full blast.  (I used it all day yesterday and my feet were still cold...)

My buddy the blacksmith, Dennis Miles at Double Edge Forge, says they have two Lasko ceramic heaters...and they do a great job in his old farmhouse.  Definitely looking at that option, since they can be had with a timer as well as a thermostat.  We plan to use some sort of timer to turn on the heat about an hour before I'll be going out there, but a more efficient heater sounds like a good plan, too.

We have recycled single-pane windows, and the French door will be a heat loser, too...we plan to make removable storm windows for the two windows, and I'll use some sort of curtain over the one by the desk.  Years ago I made quilted roman shades in my LR that helped a lot...probably try something like that.  (It gets below zero here, from time to time.)

Weatherstripping around the doors will help, too...seems like a lot to do, but I like that sort of work.

Eventually, I hope to build a passive solar collector for the south side of the shed--I'd like it to be movable, so I can use it in winter, but not in summer's heat.  The shed has no windows on that side because the view was nothing but cars and houses and I wanted some privacy--as WELL as a place for the big bookcases, the desk and all, of course.  Perfect place for a simple heat collector...it could even vent into the AC's vent hole.

Wouldn't you know I just ditched an old Mother Earth News article about building just that.  Recycling is good and I desperately need to simplify my life (been big into Discardia lately!) but...well, I used to write for them a few decades ago, I'm sure I can find something...

Here's another blogger's small-house thoughts on insulation...good stuff--to which he added, HERE.

Meanwhile, we've been making a LOT of progress...watch upcoming posts!

Friday, July 30, 2010

Life's little puzzles...


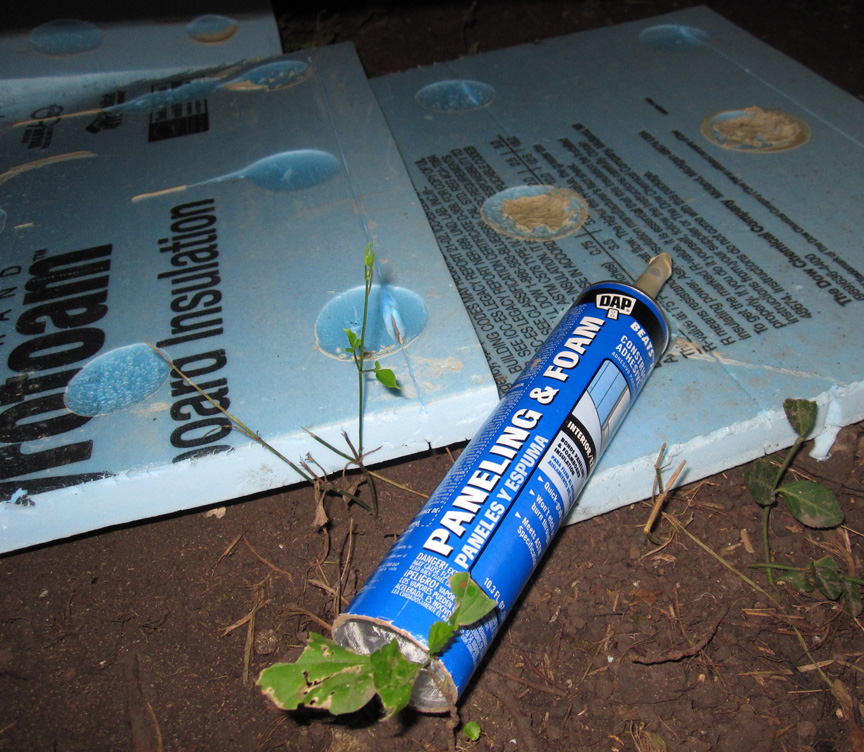
So.  Mark used construction adhesive meant for Styrofoam to attach the insulation to the underside of the shed.  It says right on it that this is the product for the job.

So why are two panels now lying on the ground UNDER the shed after a week or so?  Will they all let go?  As you can see in the second photo, they made good contact, originally. 

It wasn't a pleasant job, putting them up under there in the first place, I know.  Guess we contact the lumberyard and ask if they have any brilliant ideas...or the adhesive manufacturer.  Not thrilled here...

LinkWithin

Related Posts with Thumbnails